Tokyo Travel Guide 2025: Itinerary, Budget, Tips, and Promo Codes!
Is this real? Yes, it is! It's currently 1:00AM on a Wednesday morning, exactly 2 months since I got back from Tokyo, and I randomly realized it was time to start actually posting more of these travel guides because I have so much to say, and because it's always better having one long travel guide in one post than sifting through all my Instagram stories. Kidding.

Anyway, I'll be getting straight to the point and sharing everything I did in Tokyo, how much my boyfriend and I spent, and a few travel tips sprinkled throughout my itinerary, so keep on reading!
Traveling to Japan from the Philippines

Airfare from Philippines to Tokyo doesn't have to be pricey! Anything upwards of P10,000 is already expensive to me, that's why I try to keep it as low as P7,000 with luggage.
For this trip, I tried to book during Cebu Pacific's 3.3 piso sale. I managed to get MNL > NRT > CRK flight for P8,835 each, including 1pc 20kg luggage allowance. This doesn't include travel tax. I decided to do NRT > CRK because it ended up being way cheaper, and the commute from Clark to Manila wasn't that bad, it was just a bit traffic and only costed P450 each via P2P bus!
Now, make sure that you prepare these Japan travel requirements for Filipinos:
- Your passport with 6 months validity
- eTravel QR code for both PH departure and arrival
- Japan Digital QR Code for immigration and customs upon arrival and departure
- Valid Japan visa
- Boarding pass (in case immigration asks)
- Hotel booking confirmation and proof of return flight (in case immigration asks)
Immigration went smoothly, I was only asked if I was traveling solo and if I was a government worker (I wasn't). We also had no flight delays. We departed and arrived right on time for both flights.
Internet Connection
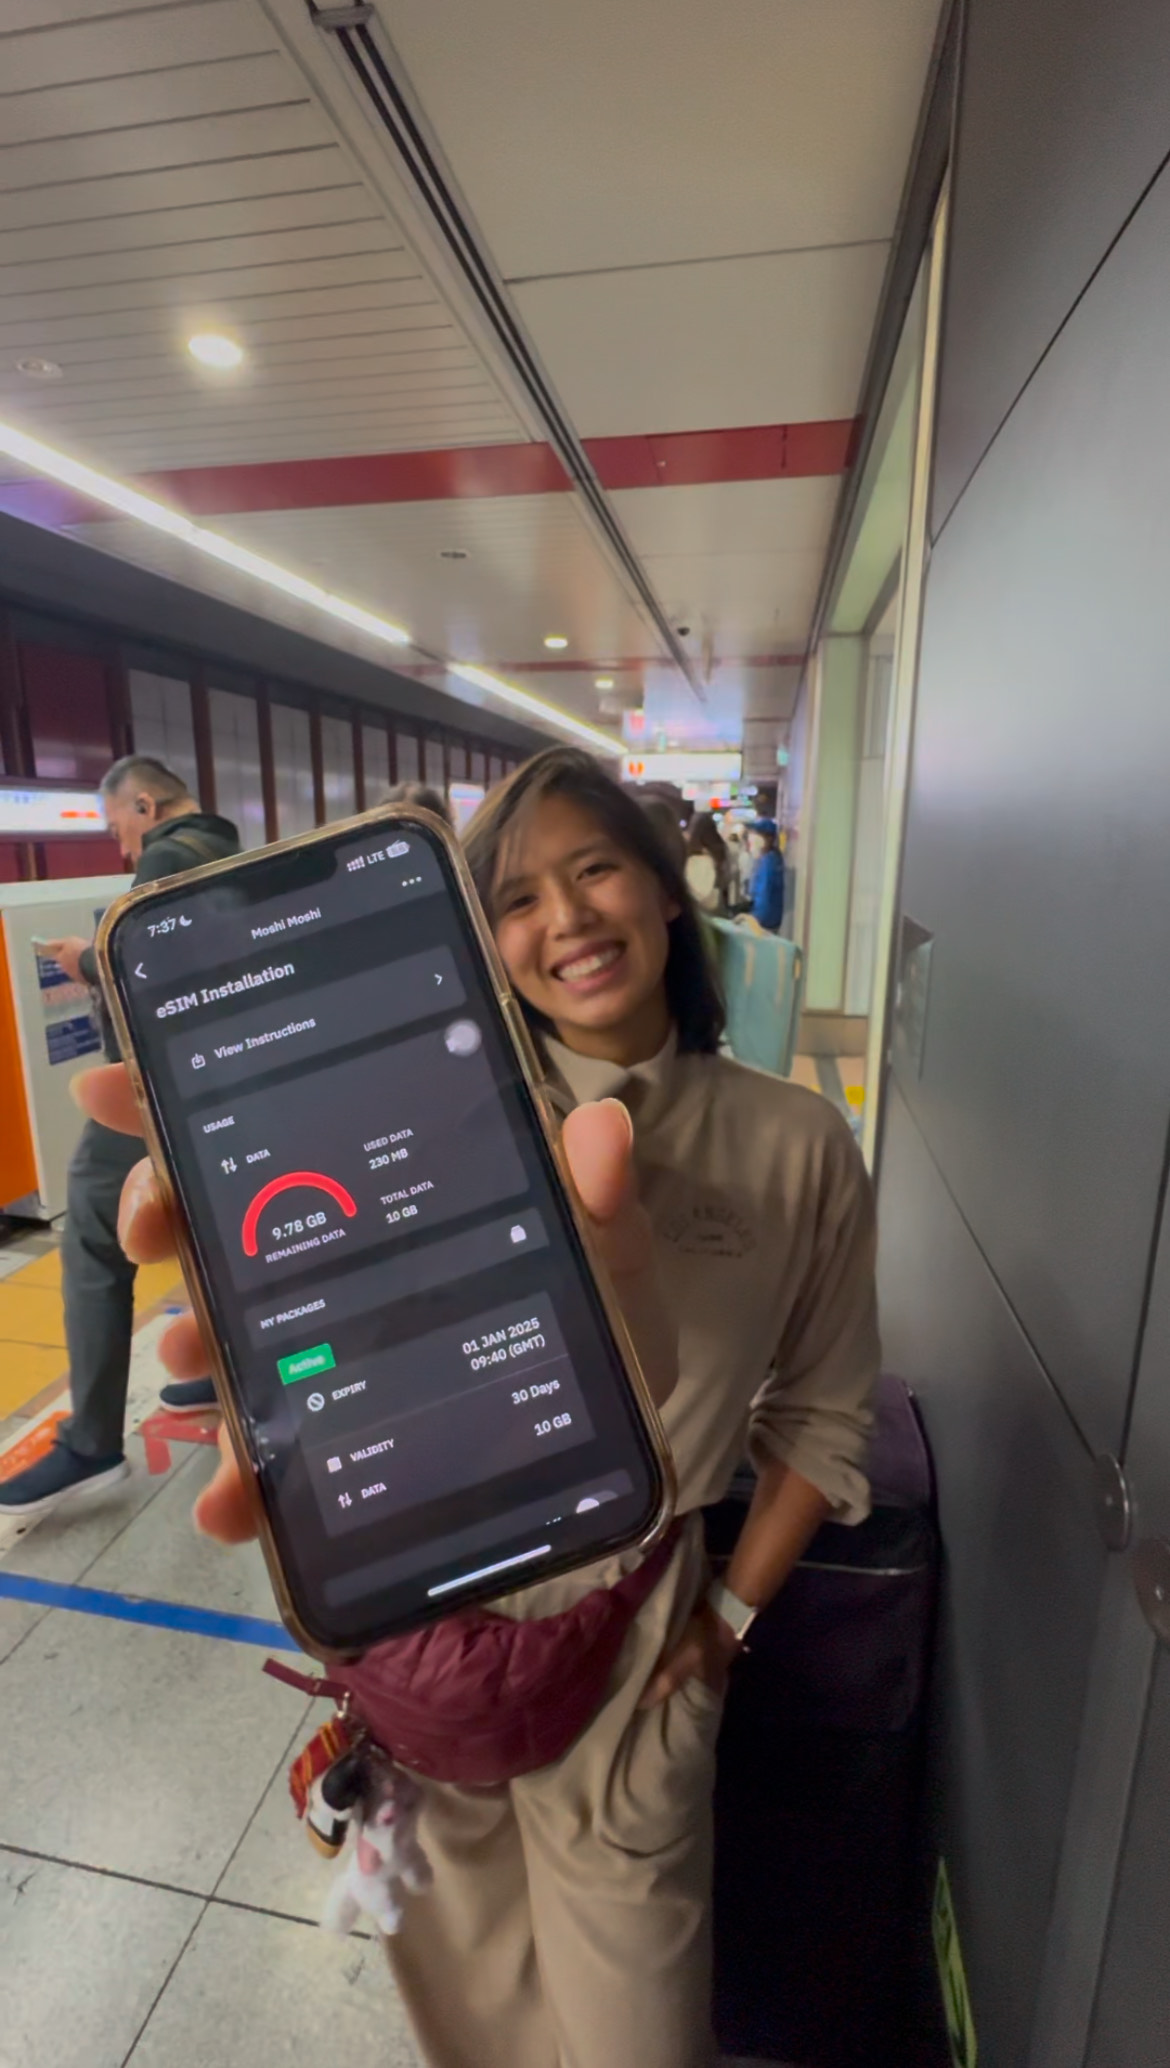
I used an Airalo eSIM which was SO easy to activate. I just needed WiFi from NAIA (or your mobile data) and it only took a few minutes. Signal was great throughout the trip, too! I recommend having 1-2GB per travel day, which will fit as long as you aren't streaming.
Use my Airalo promo code ISSA10 for 10% off! If you're knew to Airalo, you can click here to get a 15% discount on your first eSIM.
Commuting Around Tokyo
Here are the things I recommend getting to make your commute around Tokyo much easier:
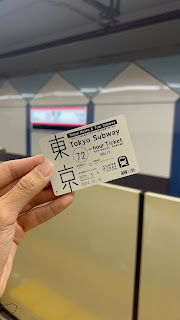 Tokyo Subway Pass

The Tokyo Subway Pass was an absolute gamechanger for me! It's basically unlimited use of the Tokyo subway, which can reach all the hotspots. So, if you're going to DIY your travel days around Tokyo, I definitely recommend getting this pass because you can hit all the hotspots without the hassle or extra expense of buying individual tickets. Just insert your subway pass to the ticket machine each time!
If you'll be using the subway more than 5-10 times a day, you'll definitely get your money's worth and more. You'll be able to get to areas like Ginza, Shibuya, Shinjuku, Asakusa, and other Tokyo hotspots without needing any other pass. Just make sure you choose routes that solely use the appropriate subway lines, Google Maps will help you with that.
IC/Suica/Pasmo Card
If you plan to use buses or go outside Tokyo (like the Maihama Station for Disneyland or another attraction outside Tokyo), then this is very useful. Actually, it's a must-have to easily commute around Japan as a whole! You can get any of these cards at the airport and load it up whenever needed at train stations. Think of it as a Beep card.
Airport commute

- Keisei Skyliner Narita Airport Express - The fastest way to commute to Tokyo, it's P868 one-way.
- Narita Express Train - Another one of the faster ways to commute to and from Tokyo via JR, the price depends on the route but it's usually around P1,200 one-way.
- Limousine bus - I've never used this but what's great is that it picks up and drops you off to specific stations/hotels, so it may be convenient if it stops right at your hotel. It's 1,400 yen (P540) each way and you can find routes/schedules here.
- Private or shared transfer - Haven't tried this but it's a convenient way to go to and from the airport instead of hauling your luggage to the train stations! That said, it's significantly more expensive, especially when getting a private airport transfer. I recommend this only when traveling in groups and/or with seniors and kids.
- When booking via Klook, use Klook promo code ISSAPANDASKLOOK for 3-5% discounts!
JR Pass
I don't recommend getting the JR Pass anymore because the prices are so high, UNLESS you plan on taking the shinkansen to other areas like Osaka, Hiroshima, Nagoya, etc. But even then, you might still not get your money's worth! Use this JR Pass calculator to calculate all your routes and see if it's worth it. Since it's expensive, you'll want to pre-plan your routes!
If you're staying around Tokyo and nearby areas, the JR Tokyo Wide Pass may be useful, but I was fine with the Tokyo Subway Pass throughout the trip and simply purchasing tickets whenever necessary.
Our Tokyo Hotel

We stayed in one place the entire time: HOTEL MYSTAYS Asakusa. You can book this via Klook or Agoda. I paid for about P3,350 a night thanks to Klook's birthday sale, but I recommend comparing prices with Agoda to see which is cheaper. Here are hotel promo codes you can use for extra discounts:
- Agoda promo code: ISSAPANDAS
- Klook promo code: ISSAPANDASKLOOK
Now, don't expect a spacious hotel room. It's about 13 sqm so you can estimate how small it will be, similar to most hotels in Tokyo. That said, it was just right for 2 of us, but a bit of a squeeze with all our luggage. It had everything we need as well, like a desk, microwave and fridge, shower with heater, WiFi (it was slow, though), coin laundry machines, refillable toiletries, and a comfy bed. No housekeeping, you will need to request new towels and sheets yourself.
What I appreciate is the location, which was a 15-minute walk from Sensoji Temple, 20ish-minute walk from Tokyo SkyTree (but you can just take a train, it's 1 stop away), and 10-minute walk from nearby train stations. It's also very near bus stations, convenience stores, and restaurants.
Most importantly for me, it was very accessible from the airport, we just needed to take 1 train ride, no transfers. Saved us time and energy!
Tokyo DIY Itinerary

Now, onto our itinerary. Mind you, this is my 2nd time in Tokyo so while we repeated some attractions, we skipped others like Shibuya Sky, Ginza, Sensoji Temple, Ueno Park, etc. You can check out my 2023 travel guide here to know where we visited on our first time in Tokyo. But honestly, the time we had still wasn't enough to roam around the area!
 Day 1: Arrival

We arrived at around 7:00PM and got to our hotel by 9-10PM, so we just had dinner from 7/11 (my tradition whenever I arrive in Japan) and slept!
Day 2:
- Akihabara to shop for my DJI Osmo Pocket 3 and other merch
- Shinjuku to window shop
- Pokemon Cafe in the early evening
- Roponggi to see the Christmas lights
 Day 3: Tokyo Disneyland
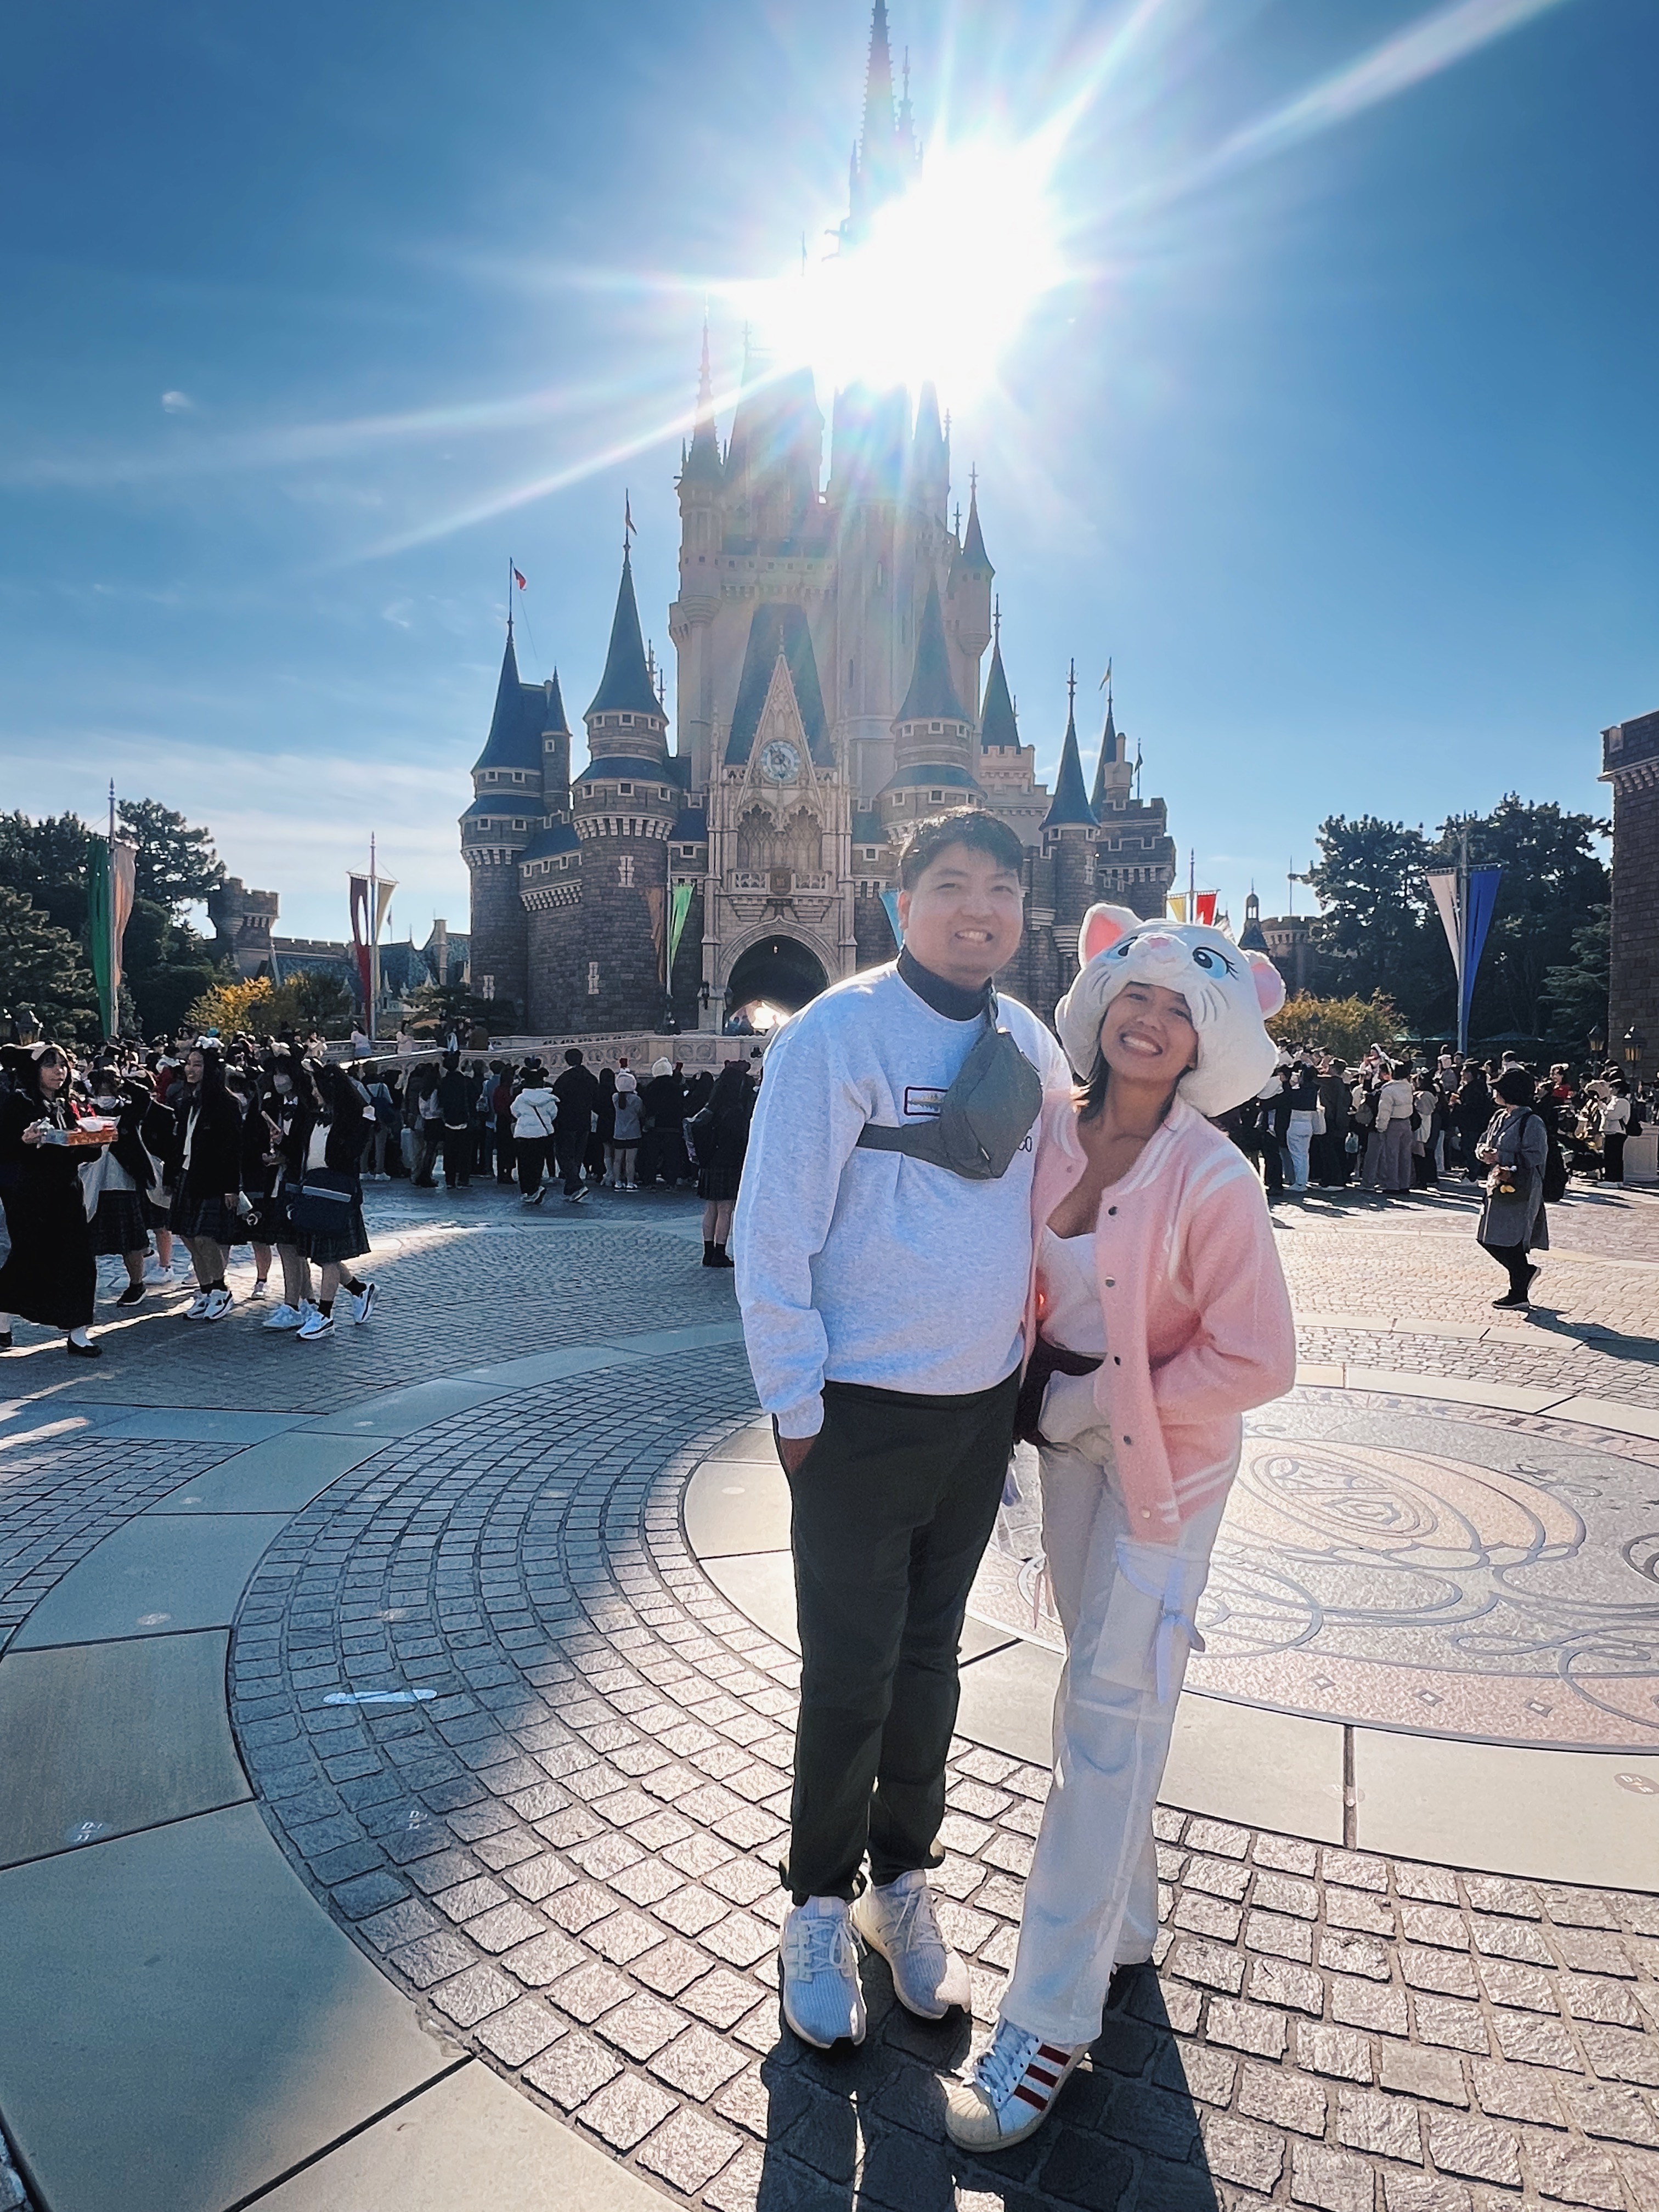
We woke up extra early for Tokyo Disneyland to try rope dropping Enchanted Tale of Beauty and the Beast, but even then, it was a 2-hour wait time! The ride broke down after an hour of waiting, which ended up being great news since we were given fast passes to ride it when it was operating again. Make sure you wear good shoes when in DisneySea and Disneyland, you'll be walking and standing in line a lot, but personally, this is still the best place to be!
I booked our tickets via Klook and it was so easy to redeem and link to the Tokyo Disney Resort app. I managed to do it immediately after I received the voucher in my email.
 Day 4: Tokyo Toyosu Manyo Onsen

After an entire day of walking in Disneyland, we woke up a bit later and headed to DiverCity Tokyo Plaza to check out The Gundam Base Tokyo and window shop. Afterward, we went to the Tokyo Toyosu Manyo Onsen. I booked this via Klook and just needed to show my voucher to reception. Use Klook promo code ISSAPANDASKLOOK for 3-5% off!
It was our first time at an onsen so we didn't know what to expect, but let me tell you - I would visit again! Maybe it was this particular onsen that set the standard, but I loved the rooftop foot bath, the yummy buffet, a super quiet reading room, and they've even got a spa where you can get massages.
The best part is that the onsen is open 24/7, so what I'd do next time is to spend my last night here and commute to the airport the day after. Saves me more on accommodation and I get a relaxing stay out of it!
 Day 5: Warner Bros Studio Tour and Tokyo Sky Tree

For Harry Potter fans, the Warner Bros Studio Tour should be on top of your list! If you can get the earliest slot, then better for fewer people, especially when it comes to the Backlot Cafe because lines are long. Also, allot at least 5-6 hours for this, the place is huge. I booked this during the KKDay B1G1 sale so we saved more, but you can also book it via Klook.
We went to Tokyo SkyTree right on time for the sunset, which was gorgeous. Personally, I prefer Shibuya Sky because of its open concept, but the taller 360-degree view from Tokyo SkyTree was also worth seeing. This was also booked via Klook and we saved a lot more time compared to purchasing tickets on the day itself, the lines were a bit long! Use Klook promo code ISSAPANDASKLOOK for 3-5% off.
 Day 6: Sagamiko MORI MORI

If you'll make it to the Sagamiko Illumillion light show, this park is definitely a must-visit! The lights are so beautiful and the rides are pretty fun, too! It'll be quite a journey from Tokyo, but it's worth it. I recommend getting the option with the bus ride for more convenience. Also, the lights show is until April, so you might want to add this to your itinerary!
You can book your Sagamiko MORI MORI ticket with a bus ride via Klook and use my promo code for an extra discount.
 Day 7: Akihabara and Shibuya

Another chill day, but we also used this time to head to Don Quijote and purchased all our souvenirs! Note to self - Don't buy too much because the commute back to the hotel will hurt so much with all the heavy lifting.
 Day 8: Hakone Day Tour

This was such a fun experience since this was my first time in Hakone! I highly recommend going up the Hakone Temple rather than wait in line at the Torii gate for a photo, it can take up to an hour. Also, when taking the pirate ship, splurge a bit and get first class tickets, it will be an 1,840 yen (compared to 1,000 yen for regular tickets) but so worth it for less crowds and comfy seating.
If booking the tour via Klook, use my promo code ISSAPANDASKLOOK for 3-5% off.
 Day 9: Tokyo DisneySea

We woke up extra early to head to Tokyo DisneySea and arrived at around 8:30ish in the morning. Fortunately, we still got to snag passes for Peter Pan's Neverland Adventure and Rapunzel's Lantern Festival! I recommend arriving at around 7-8AM, or even earlier, so you'll be sure to get passes.
Just like Tokyo Disneyland, I booked our Tokyo DisneySea tickets via Klook!
 Day 10: Akihabara, Shibuya, and Asakusa

This was more of a rest day where we bought extra luggage, went around window shopping, and tried some restaurants I've been eyeing. We spent most of our time packing and making sure everything fit, and fortunately it did!
Day 11: Flight Home
We took the early morning train to the airport and it only took about an hour to check in our luggage and go through immigration and security. It took a bit long mostly because of the line to check in our luggage and get our boarding passes.
11D10N Tokyo Travel Budget

Here's the fun part: Our overall Tokyo travel budget for 2 people! We spent 11 days and 10 nights and here's how much it costed:
- Flight: P8,835
- Travel tax for 1: P1,620
- Hotel: P33,510
- Tokyo Disneyland and DisneySea: P14,060
- Hakone Tour with pirate ship: P6,500
- Tokyo Toyosu Manyo Onsen with buffet: P3,600
- Warner Bros Studio Tour for Harry Potter: P3,755 (got this via KKDay on a Buy 1 Get 1 deal)
- Tokyo SkyTree: P2,125
- Sagamiko MORI MORI: P2,060
- Food and misc purchases: P28,760
- Transpo allowance: P9,000
- eSIMs: P1,340
Grand total: P124,000 or P62,000 each! Here are some tips that helped us spend less:
- Sales! We took advantage of CebPac’s seat sale, Klook’s hotel sale, and KKDay’s B1G1 travel sale! It’s best to book in advance and time your bookings according to when most companies have sales (anniversary/birthday sales, 11.11, holiday sales, etc). Also, you can use my promo codes for extra discounts:
- Klook promo code: ISSAPANDASKLOOK (3-5% off)
- Agoda promo code: ISSAPANDAS (10% off)
- Airalo promo code: ISSA10 (10% off)
- Airfare: I could have saved more here (like ₱3,000 each), but I only got to avail of the piso sale for our MNL>NRT flight (₱1,850 each), then got the cheapest I could find for NRT>CRK (₱4,850 each), without luggage yet. When doing piso sale, make sure you’re ready even before 12AM on the day of the sale, and use 2 devices if you can for more chances!
- Transportation passes: In Tokyo, we used the Tokyo Subway Pass to go around, so unli train rides around the area! However, we’d go a bit outside Tokyo as well, so that ate up a bit of our budget. We didn’t take any taxis/Ubers, that’s for sure!
- Check your banks/credit cards for any travel promo. For BDO, there were cashback deals for Donki, travel purchases, and general shopping. They even partnered with Klook and had promo codes for hotels (up to ₱5,000 off). - We didn’t scrimp on food some days, hehe. You can save more by eating in konbinis, though there are many restaurants with meals under ¥1,000 (₱400ish).
- You can definitely save way more if you skip some attractions! For me, the must-do’s are Tokyo DisneySea, Hakone/Mt. Fuji tour, Shibuya Sky/Tokyo SkyTree, and maybe an onsen. That said, there are many free attractions you can visit when in Tokyo, just walking around is super fun! It all depends on your interests.
- ATM fees: no ATM fees when withdrawing at a 7/11 ATM, and the exchange rate is good! It’s also worth changing money in advance so you have physical cash (yes, there will be times you’ll need physical cash, tho most times, I used my card).

And there you have it! Enjoy Tokyo! I'll see you on the next trip (Ho Chi Minh again!)
.JPG)

Comments
Post a Comment
T'would be appreciated if you leave your opinions and comments.
I'll be sure to check out your blog and reply asap! x